Attempting to image the abdomen using ultrasound can be daunting due to the technical ability required, the complex abdominal anatomy and significant anatomical variation. An appreciation of the different echogenicity of abdominal organs and artefacts such as acoustic enhancement and shadowing seen when scanning through the abdomen are key in interpreting the images obtained and making a correct diagnosis. A key part of point of care abdominal scanning is to appreciate the effects of preparation of the patient for elective scanning against that of scanning the patient at the bedside, where preparation is often suboptimal. Often, bowel gas is difficult to predict and challenges the most experienced sonographer to obtain good quality images.
Choice of probe
Generally the probe for abdominal scanning is a low frequency (generally 3-5 Mhz) curvilinear probe. It is essential to ensure there is correct usage of the depth to ensure that the organs being scanned are viewed without too much ‘dead space” below the organs being scanned. It is also essential to utilise the gain effectively to allow focus on a particular organ along with manoeuvring the focus or multiple foci again to enhance the images and area being scanned to aid interpretation. It is therefore necessary to understand how to operate the machine being used this will maximise the quality of images produced, particularly when scanning the acutely unwell patient. Particular attention to Depth; Gain; Focus/Zoom is required.
Scan process
The FAMUS abdominal module has been designed to enable acute physicians to gather useful diagnostic information quickly and to improve the safety and efficiency of urgent bedside abdominal procedures for sick medical patients.
Two specific focus areas of abdominal ultrasound have been identified which are covered in a reproducible seven-point scan. The operator should be competent to:
1) Assess the presence and/or degree of peritoneal free fluid [ascites]
2) Assess the kidneys and bladder to rule in/rule out urinary tract obstruction
Abdominal organs
To be able to capture the precise views required the operator will need to have a basic understanding of the appearance of other abdominal structures and organs which may act as landmarks or acoustic windows when imaging the free peritoneal spaces and the urinary tract. The mnemonic ‘PLiSK‘ is useful to remember the descending order of echogenicity in healthy abdominal organs: from the brightest Pancreas →Liver →Spleen→ the least echogenic Kidney.
Liver
The normal liver is easily visible as a large, smooth edged, homogeneous textured organ with the left lobe seen primarily in the epigastrium, and caudate and right lobes in the right upper quadrant and flank. It is bordered superiorly by the brightly reflective diaphragm. Liver should be more echogenic than the renal cortex at a similar depth though excessive echo-brightness might suggest fatty infiltration. Portal and hepatic vessels are visible in normal liver architecture, but visible intra-hepatic ducts suggest dilatation and obstruction.
Gallbladder
When patients are fasted the gallbladder will appear as a thin-walled, black (anechoic) pear shaped structure lying centrally beneath the liver. Sludge, brightly reflective gallstones or polyps may be visible within the gallbladder. Acoustic enhancement by bile may make distal structures appear bright.
Spleen
The spleen is homogeneous textured and crescent shaped with a smooth convex surface adjacent to the diaphragm and an irregular edged hilum abutting the stomach and left kidney. Generally it is best seen in the 9th – 11th intercostal spaces in the left mid-axillary line. Bear in mind that interposing aerated lung may obscure the window hence scanning on expiration may improve views.
Uterus
When scanning the bladder in female patients the uterus should be visible in the midline posterior to the bladder. The body of the uterus (myometrium) should appear homogeneous in texture with a thin bright line of endometrium visible down the centre. It may be anteverted towards the bladder or retroverted towards the rectum into the pouch of Douglas, of which it forms the anterior border.
Assessment of abdominal free fluid
While other focused ultrasound protocols e.g. FAST require urgent identification of abdominal fluid to signify intra-abdominal haemorrhage, the unwell medical patient is more likely to develop free fluid in the abdomen due to ascites; usually from liver disease, but also malignancy or cardiac failure. The appearances of blood and ascites may have subtle differences but the techniques and probe positions required to visualise them are the same. Confirming the presence of ascites clinically can be challenging in the acute setting. Sonographic confirmation at the bedside can improve diagnostic accuracy and guide safe diagnostic and therapeutic abdominal paracentesis, which may be urgent e.g. in the sick liver patient.
Probe position
Right upper quadrant – coronal view
Small volumes of fluid may only be seen in Morrison’s pouch between the liver and right kidney. As volume increases fluid will surround the liver and adjacent bowel and fill the sub-diaphragmatic space. It is always worth trying to visualise the tip of the liver from this view as it may be one of the only places you visualise free fluid if it is present.
Video 1: Normal right upper quadrant appearance
Left upper quadrant – coronal view
Depending on its origin and patient position fluid may first appear around the superior aspect of the spleen beneath the diaphragm or in the spleno-renal recess. Significant hepatomegaly or splenomegaly may preclude those quadrants as sites for therapeutic drainage
Video 2: Normal left upper quadrant appearance
Suprapubic – longitudinal and transverse views
Look posterior to the bladder (and pouch of Douglas in females) for evidence of free fluid in both planes. A full bladder and its acoustic enhancement will help to pick up smaller volumes. Imaging the bladder (and assessing for free fluid outside the bladder) is the third point on the FAMUS 7 point scan.
Video 3: normal transverse and longitudinal appearances of the bladder. Note the acoustic enhancement (seen as a brightness) in the deep borders of the bladder, an artefact seen when ultrasound passes through volumes of fluid.
In contrast, the video below shows the appearances of a small volume bladder with a catheter in situ. It is important when assessing the catheterised patient (and indeed anyone in whom the bladder is not quickly visualised) to ensure the probe is tilted fully to visualise into the pelvis, under the symphysis pubis. It is here you will often find the collapsed/empty bladder.
Video 4: Partially collapsed bladder around a urinary catheter
While the above areas are the most sensitive points for picking up small volumes of fluid, many patients will have much larger volume ascites with fluid detectable throughout the peritoneal cavity and visibly surrounding small and large bowel. If ascites is detected and fluid removal is necessary, it is useful to slide the probe in an oblique position across the left and right lower quadrants and flanks to find the deepest (and therefore potentially safest) pocket of fluid to attempt needle paracentesis or drainage. It may assist the operator for the patient to lean 20-30° towards the side being imaged. The right and left lower quadrants are the 4th and 5th areas to scan is the 7 point FAMUS scan. For examples of free fluid in the abdominal scan, see video 5 below.
Video 5: Examples of free fluid within the abdomen
Focused assessment of the urinary tract
The primary objective of a focused ultrasound examination of the urinary tract is to rapidly rule in or rule out urinary tract obstruction. In completing the seven-point abdominal scan, the operator should also be able to describe the likely level and severity of obstruction thus guiding further management. The commonest forms of urinary tract obstruction seen in acutely ill patients are bladder outflow obstruction and unilateral ureteric obstruction. Urinary stasis in both situations predisposes to bacterial infection which can quickly lead to sepsis if left unmanaged. Likewise, increased retrograde pressure can cause acute kidney injury which will not recover without relieving the obstruction, be it temporarily or definitively.
As with other areas of focused ultrasound, operators will inevitably pick up abnormal appearances in the urinary tract which lie outwith the defined curriculum. Common abnormalities of the kidney might include cysts, polycystic kidneys, stones, abscess or even tumour (examples of many of these are within the pathology section). While the description and interpretation of these pathologies may be beyond the scope of our course, it is recommended to always describe and document any abnormal findings, save images where possible and refer the patient on for definitive imaging as appropriate.
Kidneys
As with scanning any organ, the kidney should be visualised in its entirety in two planes – longitudinal (LS) and transverse (TS) sections. It is customary to locate the kidney in LS first and this can usually be found in the flank just posterior to the mid-axillary line with the tip of the probe pointing slightly back in a posteriorly oblique angle. Remember the kidneys are retroperitoneal and as such are further back than people often realise. With the threat of obscuring bowel gas ever-present in abdominal ultrasound, different techniques may be required to see the whole kidney. Remember to use acoustic windows – the right lobe of the liver and the spleen can offer good views through to the kidneys while avoiding interposition of large bowel. It may help to move the patient between a supine and lateral decubitus position while sliding the probe antero- medially or posteriorly. Also deep inspiration and breath holding can be helpful to push the kidneys down into view and improve the image.
Once the kidney can be seen well in LS, manoeuvre the probe to achieve maximum pole-pole length and save an image. Then sweep through the organ in that plane to ensure the whole kidney has been seen. Rotate the probe 90° anti-clockwise to see the kidney in TS. Save an image at the hilum where renal vessels and ureter may be seen. Sweep through kidney from top to bottom.
Normal kidney appearance
The kidney is enclosed by a fibrous capsule and Gerota’s fascia which are visible as a thin hyperechoic line between the liver and kidney. Within the capsule lies the renal parenchyma made up of cortex and medulla. The cortex should be less echogenic than the liver of the same depth (remember PLiSK) and contains regularly spaced hypoechoic medullary pyramids. The central sinus complex of vessels and collecting system surrounded by fat is hyperechoic compared with surrounding parenchyma.
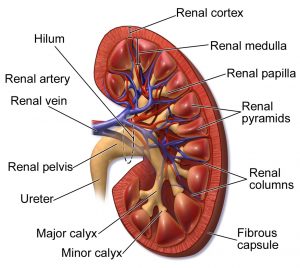
Figure 1: Anatomy of a normal kidney, from Blausen.com staff (2014). “Medical gallery of Blausen Medical 2014“. WikiJournal of Medicine 1 (2).
Video 6: Normal kidneys in longitudinal section, fanning through
Hydronephrosis
There are various ways that hydronephrosis can be categorised, but FAMUS utilises a visual assessment. Figure 2 below summarises the three grades pictorially, from mild/grade 1 (left), to severe/grade 3 (on the right). Further explanation and cine images are shown after that.
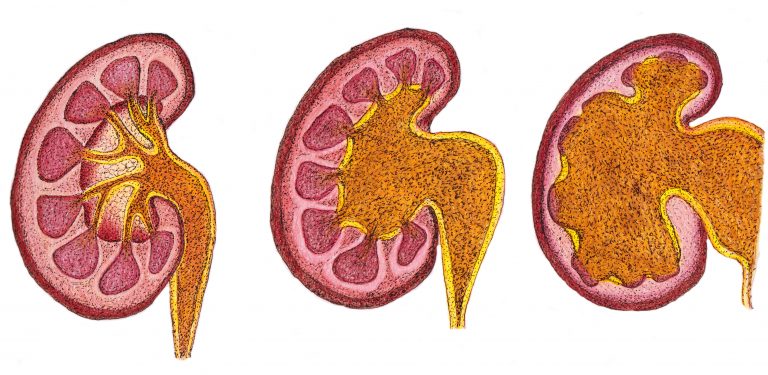
Figure 2: Degrees of hydronephrosis, from grade 1/mild (left), through grade 2/moderate (centre) to grade 3/severe (right)
Grade 1 (mild): Renal pelvis dilatation, no/mild calyceal dilatation, no parenchymal atrophy. Unlikely to be clinically significant, may be seen in pregnancy and with a very full bladder pre-void.
Video 7: Mild hydronephrosis
Grade 2 (moderate): moderate pelvis and calyceal dilatation; early parenchymal atrophy may be present.
Video 8: Moderate hydronephrosis
Grade 3 (severe): Pelvic and calyceal dilatation, loss of normal architecture, cortical atrophy
Video 9: Severe hydronephrosis
Bladder
An adequately distended bladder will appear as a trapezoid anechoic structure in transverse section just superior to the symphysis pubis. It should be thin walled and free of stones or debris. It is easy to mistake reflected echoes at the back of the bladder for sediment so remember to adjust your gain/TGC. As with other organs we recommend scanning through the entirety of the bladder in both LS and TS and recording images in the midline. If it is not adequately distended the normal bladder wall will appear thickened.
If bladder outflow obstruction is present, a diagnosis of acute urinary retention is most often made clinically and confirmed either via urethral catheterisation or bladder ultrasound. While the normal bladder volume can be somewhere between 400 and 600ml, single ultrasound measurements of bladder volume – an algorithmic approximation – may not be accurate and without asking the subject to empty their bladder will not prove or disprove urinary retention.
Clearly the extremes of bladder volume will be informative and a grossly distended bladder which cannot be voided supports the diagnosis of outflow obstruction . Post-void volume measurements may be useful in patients with persistent urine infection, but can be misleading in the acutely unwell or septic patient. (Nb most ultrasound machines will be able to calculate a volume based on maximal depths in two planes with three caliper measurements to enable the calculation of absolute volume).
Thus the seven point FAMUS abdominal-renal scan is completed. Points 1 and 2 refer to the right upper quadrant for free fluid and right kidney for hydronephrosis, points 3 and 4 for the left upper quadrant for free fluid and left kidney for hydronephrosis. Points 5 and 6 look at the iliac fossae to assess for fluid and site mark for drainage and point 7 to view the bladder for distension and associated free fluid.
For examples of pathology within the abdominal scan, see here.
A copy of the abdominal-renal FAMUS reporting sheet is available here.
Have any questions?
If you have any FAMUS queries not covered by the following pages, please check out or FAQ section. If this still doesn't answer your queries, please contact FAMUS@acutemedicine.org.uk