Point of care ultrasound for vascular access is increasing in its availability and use. In the right hands, ultrasound guided vascular access can improve successful cannulation rates, reduce iatrogenic injury and the number of attempts at cannulation1. Broadly, the use of ultrasound improves safety and success in vascular access procedures. For access problems, ultrasound can be used to aid in central or peripheral venous procedures, as well as arterial access where needed. The main limiting factor for ultrasound use – apart from machine availability – is an appropriately qualified individual. As a result, in the right hands there are no absolute contraindications to using ultrasound as an adjunct in the vascular access process.
Vascular access sites
Choice of site is largely based on the reason generating that access need. One should also consider the calibre of the vessel to be accessed, the depth and course of the vessel, as well as superficial issues (like overlying cellulitis) and surrounding structures. Central sites of use are predominantly internal jugular vein, femoral vein and subclavian vein. Peripheral sites may include cubital, cephalic or basilic veins in the upper limb.
| Vein | Artery | |
| Wall | Thin | Thicker (brighter) |
| Pulse | Non-pulsatile | Pulsatile |
| Compression with minimal pressure | Compressible | Much less compressible |
| Spectral Doppler | Low/no velocity | Higher velocity |
Table 1: Sonographic differences between artery and vein
Video 1: Identification of peripheral vessels and patency. Note the vessels display all the characteristics in table 1 above
The process
The minimum dataset guiding how to perform peripheral vascular access can be found here.
In FAMUS, we promote the use of real time visualisation of the needle tip during the vascular access process. This dynamic approach is in favour of a more static approach, where the ultrasound is used to identify the structures of importance, site marking then occurs before performing the invasive procedure. Although the static approach is not completely landmark based, the lack of visualisation of the needle tip means we feel this approach is inferior to the dynamic approach.
It is possible to undertake ultrasound guided vascular access using either an out-of-plane (short axis) or in-plane (long axis) technique. Each has it’s advantages and disadvantages and much will depend on user experience and the anatomy of the vessel to be accessed.
Using the short-axis view, the vessel lies (and the needle appears) perpendicular to the image plane. This gives the view of an oval shaped vessel with an echoic/bright wall (better seen in arteries) and an anechoic/dark lumen passing into the screen, with the needle appearing as a hyper-echoic/very bright point (in cross-section; out-of-plane) within that image (Figure 1; video 1).
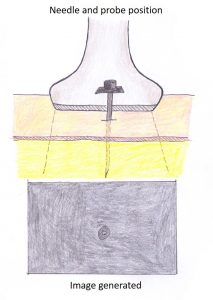
Video 1: Out of plane cannulation of a vessel
In the long-axis view, the ultrasound beam runs parallel to the vessel path and gives the opportunity for full visualisation of the needle tip and shaft (as it advances) which is in-plane (Figure 2; video 2). Bearing in mind that the ultrasound beam is only a few millimetres thick, care should be taken to ensure that the needle and vessel remain in-plane with that beam. Careful positioning, ensuring adequate space to allow for the probe footprint and the needle, and steady hands are required. The obvious benefit of this technique is the visualisation of the needle shaft and tip all the way as it advances to the target point.
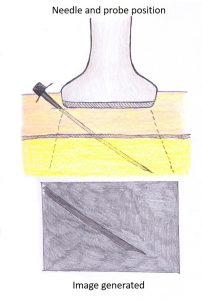
Figure 2: In plane approach
Video 2: In plane cannulation of a vessel
After the above considerations have been resolved, an awareness of the ultrasound depth from skin to the target (vessel centre) is important. This distance is useful in the short-axis approach, as inserting the needle at a 45-degree angle, at that equivalent distance from the probe will ensure that the needle tip will roughly be at the target point (vessel centre). It is worth pointing out however, that with either the short-axis or long-axis approach, needle tip visualisation and the maintenance of sterile technique (especially in central line placement) is paramount.
When using the short-axis method, insert the needle as described above at a 45- degree angle with the insertion site being at approximately the same distance from the probe, as the depth to the target (skin to vessel centre). Slow introduction of the needle is advised at intervals. One approach is to tilt the probe towards the skin until the needle tip is seen at the entry point more superficially, then by tilting the probe deeper and then advancing the needle point deeper (small depths at a time) until visualised on the screen and then repeat the process in increments until the target is reached. As long as the initial setup (vessel in the middle of the probe with the needle inserted in alignment of this) is maintained in the short-axis, a flashback of blood into the needle or cannulae will be seen as well as the needle tip visualisation within the lumen indicating successful cannulation, when the critical depth is reached (see animation video 3 below).
Problems that one may encounter include advancing the needle off-plane in short axis (resolved by stopping and rocking the probe to find the needle tip). If not found, then withdraw the needle to a point just deep to the skin, and start again. Additionally, it is possible to advance the needle beyond the posterior wall of the vessel (resolved by withdrawing the needle until the needle tip is seen again within the lumen; the ‘target sign’). The operator should be mindful of this.
Another approach is of course to keep the probe steady, visualising the vessel, inserting the needle at an equivalent distance from the probe and at 45 degrees and with small, gentle incremental depths, the target will be met by the needle (Video 2).
In the long axis, once there is good visualisation of the vessel and the probe is held steady, insert the needle adjacent to the probe and in plane with the beam. The tip of the needle should first be seen and then with gradual advancements, then shaft is seen. Both the needle tip and shaft can then be followed as it slowly advances towards the vessel, indents the vessel wall and then penetrates into the lumen producing a blood flashback in the needle or cannulae. The obvious problem here is to ensure that the vessel and needle remain in plane of the narrow ultrasound beam.
Once flashback is achieved (using either method above), advance the needle a little further to be clear of the vessel wall. Then use the ultrasound to confirm the position (within the central lumen of the vessel of choice). After this you can withdraw blood, advance the cannula or place the guide-wire and proceed as necessary.
Have any questions?
If you have any FAMUS queries not covered by the following pages, please check out or FAQ section. If this still doesn't answer your queries, please contact FAMUS@acutemedicine.org.uk