The 2012 NICE guidance on VTE recommends proximal leg vein ultrasound scanning as the diagnostic endpoint in DVT investigations. This requires a formal, complete proximal vein assessment with ultrasound. In other words, a rule-out scan. As part of the assessment of the sick or suspected VTE patient, early indication of a significant clot burden is important for the tailoring of management and overall care of the patient. There is now mounting evidence1,2,3 that is supportive of rule-in scans that help answer this critical question. In FAMUS, we have adopted a systematic rule-in scanning protocol that aids management (identifies significant clot load) at that critical time point in the patient’s care. This however is not a rule-out departmental scan.
Equipment
For the assessment of DVT, a Brightness (B) mode ultrasound machine is needed. The probes needed for good vascular assessment need to of high frequency. High frequency probes however have lower penetration; in general, probes of over 3MHz would suffice. The vascular probe with a linear transducer has a high frequency and is useful for high resolution assessment of small legs where low depths are anticipated. For larger legs requiring higher depths, the curvilinear (e.g abdominal) transducer which has lower frequency is more appropriate.
Anatomy
The anatomy of interest is the area from the common femoral vein (CFV) down to the distal popliteal vein (trifurcation). During the FAMUS scanning process, the common femoral vein, femoral vein, profunda vein and the popliteal vein are visualised.
Scanning process
The minimum dataset detailing the images in the three part rule-in DVT scan can be found here.
Once you have positioned the patient comfortably so they are exposed from groin to knee, the first landmark to find is the ‘Mickey Mouse sign’.
The Mickey Mouse sign represents the level (in transverse plane) at which the common femoral vein and the sapheno-femoral junction are visible. The face of Mickey Mouse represents the common femoral vein (CFV), while the ears represent the common femoral artery (CFA) and the long saphenous vein (LSV). The orientation of the ‘ear’ vessels depends on which leg is being scanned. The sapheno-femoral junction is therefore the attachment point of the corresponding ear, to the face of Mickey Mouse (Figure 1).
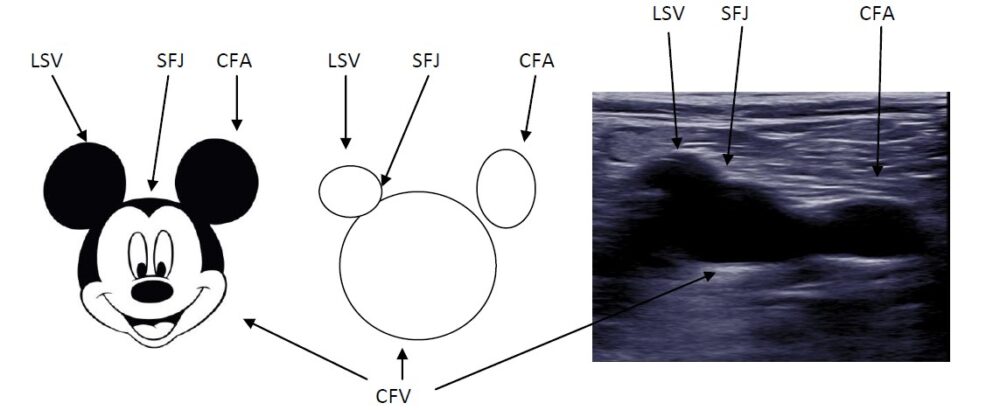
Figure 1: The Mickey Mouse sign
Video 1: identification of the Mickey Mouse sign in the groin
After identifying the Mickey Mouse sign, apply a little downward pressure on the probe to ensure that the common femoral vein (CFV) compresses (Video 2). Complete wall-to-wall compression signifies a patent vessel. Partial compression signifies non-occlusive thrombus and no compression signifies an occlusive thrombus. If thrombus is present, you will frequently (but not always) be able to visualise it within the vessel (Video 3).
Video 2: Normal compression of the CFV
Video 3: thrombus within the CFV
The differentiation between vein and artery can usually be made visually, but on occasion it can be difficult. The table below indicates the main sonographic differences.
| Vein | Artery | |
| Wall | Thin | Thicker (brighter) |
| Pulse | Non-pulsatile | Pulsatile |
| Compression with minimal pressure | Compressible | Much less compressible |
| Spectral Doppler | Low velocity | High velocity |
Table 1: sonographic differences between vein and artery
The common femoral vein represents the first point in the 3 point compression approach to ruling-in DVT. After gentle compression, the probe should then be moved medially down the thigh, while keeping focus of the femoral vein in the middle of the screen. Compressing down the length of the femoral vein will increase the sensitivity of the scanning process. Once at the mid thigh region, compression of the femoral vein should be attempted. This represents the second point in the minimum dataset (see video 4).
Video 4: femoral vein; normal compression and with confirmed DVT
After completion of above, continue to scan distally. Compress as you go along, until the femoral vein becomes difficult to visualise medially, as it continues on its course behind the knee. Lift the probe and place it in the popliteal fossa to visualise the popliteal vein, and aim to visualise the trifurcation of the vein (which can be difficult as the branches often come off at differing levels). Once the trifurcation is visualised, move slightly proximally to confirm imaging of th popliteal vein and compress. This is the third point on the minimum dataset (see video 5).
Video 5: popliteal vein; normal compression and with DVT. Note the lack of compressibility of surrounding veins indicating thrombus extends within them
What’s normal or not?
A ‘normal’ scan in this context does not mean the exclusion of a DVT, as this is a rule-in process alone.
Clear identification of the common femoral vein, down to the distal femoral vein and popliteal vein, with normal wall-to-wall compression is ‘normal’ in this context. A positive scan in this context identifies the presence of thrombotic material within the examined vessel. This identification occurs visually, or in the absence of wall-to-wall compression. The vessel could be identified as completely occluded (with obvious thrombus seen within ± no compression) or partially occluded (with obvious thrombus seen within part of the lumen ± partial compression).
For further examples of pathology within vascular imaging see the pathology section of the website.
A copy of the rule-in DVT reporting sheet is available here.
Have any questions?
If you have any FAMUS queries not covered by the following pages, please check out or FAQ section. If this still doesn't answer your queries, please contact FAMUS@acutemedicine.org.uk