The premise for the Basic Lung Ultrasound Examination (BLUE) protocol is that clinical examination with a stethoscope and plain CXR – despite their ubiquitous use – have fairly low sensitivities for picking up pathology. Lung ultrasound, in contrast, has been shown to have both a high sensitivity and specificity when used to diagnose common chest pathologies (see Table 1).
| Auscultation | Chest radiography | Lung ultrasonography | |
| Pleural effusion | |||
| Sensitivity | 42 | 39 | 92 |
| Specificity | 90 | 85 | 93 |
| Diagnostic accuracy | 61 | 47 | 93 |
| Alveolar consolidation | |||
| Sensitivity | 8 | 68 | 93 |
| Specificity | 100 | 95 | 100 |
| Diagnostic accuracy | 36 | 75 | 97 |
| Alveolar-interstitial syndrome | |||
| Sensitivity | 34 | 60 | 98 |
| Specificity | 90 | 100 | 88 |
| Diagnostic accuracy | 55 | 72 | 95 |
In response to this a protocolised bedside thoracic ultrasound examination was developed called the BLUE protocol. This was devised following an observational study of 260 consecutive patients admitted to Intensive Care Units (ICU) in France with respiratory failure. The researchers performed the BLUE protocol on these patients without knowing any history, examination or lab results and determined their suspected cause of respiratory failure; this was then compared to the final diagnosis (often by CT as the gold standard). The overall diagnostic accuracy of lung ultrasound was 90.5%, ie in 90.5% of cases the researchers were correct. And remember, this was without the benefit of blood results or history to refine the diagnosis.
The important caveats are that the researchers did not include patients with rare or non-defined diagnoses, or those with multiple final diagnoses (13.6% of all patients). The case mix ultimately included was 31% pneumonia, 24% pulmonary oedema, 18% COPD, 12% asthma, 8% PE and pneumothorax 3%. Therefore, this protocol could be considered robust to diagnose the common causes of acute respiratory failure.
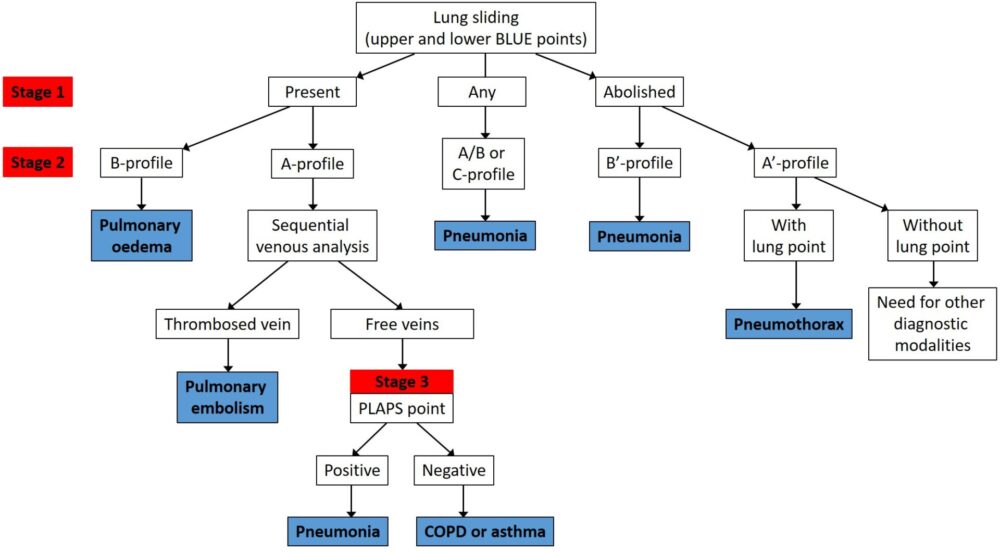
The summary of the protocol is below (Figure 1). At first glance it can appear daunting and complex but once it is worked through it will become much more intuitive.
Please note it is recommended that the following section be read once familiar with the thoracic ultrasound theory page, which details the concepts a lung sliding, A lines, B lines and consolidation.
Choice of probe
This, in the end, comes down to individual choice. The majority of the scan would usually be undertaken with the curvilinear (abdominal probe), to visualise the depths required to view all the artefacts. However, to initially determine the presence of lung sliding (see below), some people choose to use the high frequency vascular probe which offers greater resolution but sacrifices depth; reasonable to see the fairly superficial pleural surface.
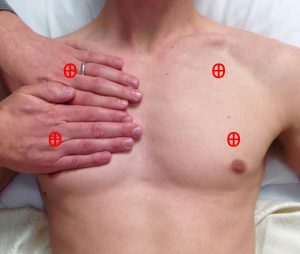
The BLUE points
The first task is to identify the upper and lower BLUE points, illustrated below (Figure 2). By placing the four fingers (excluding thumb) of the left hand below the clavicle of the patient’s right side, and having the tips of the fingers over the sternum, the upper point is located at the base of the second finger and third fingers. By placing the right hand immediately below the left so the forefingers are next to each other, you will find the lower point in the middle of the palm. Repeat the process on the other side to find all four anterior BLUE points.
Lung sliding
Once the BLUE points have been identified, the first task is to assess if there is lung sliding bilaterally. Lung sliding occurs when the parietal and visceral pleura are normally opposed and is therefore absent in pneumothorax, pleural effusion, dense consolidation and some other rarer conditions. It is sometimes described as ‘the marching of ants’ (see video 1).
Video 1: lung sliding
An example of absent lung sliding can be seen in the video below (in this case due to pneumothorax). You have to be careful not to confuse the movement of the subcutaneous tissues with respiration as true lung sliding; this is where M-mode and the barcode/stratosphere sign can be used to confirm or refute the diagnosis.
Video 2: absent lung sliding
Once lung sliding has been determined to be present or absent (NB lung sliding need only be absent on one side – bilateral absent lung sliding would indicate a very sick or apnoeic patient), the next step is to look for the presence of A or B lines on each side. For revision of the definitions of these artefacts, review the thoracic ultrasound theory page.
At this point you may have already made a diagnosis as per the flowchart above. If there is absent lung sliding and B lines then the diagnosis is pneumonia (B’ profile). If you think this through logically, you’re diagnosing a non ventilating lung (absent lung sliding, in this case due to dense consolidation) with evidence of increased lung water/inflammation evidenced by B lines. This logically would be due to infection; no other common diagnosis would make sense. Similarly, if you have bilateral lung sliding with B lines (B profile) then you have bilateral increased lung water which will be due to pulmonary oedema.
The majority of patients, however, will require further imaging along the protocol. If there is absent lung sliding and A lines only/no B lines then the most likely diagnosis is pneumothorax. In this case, you should search for a ‘lung point’ on the side of the absent lung sliding. If a lung point cannot be located the diagnosis may still be pneumothorax but alternative imaging is advised.
Lung point
The lung point will be present where a pneumothorax does not collapse the whole lung. In this instance, there will be a point on the pleural surface where the pneumothorax ‘peels’ the visceral pleura off the parietal pleura and so there will be a transition between lung sliding and no lung sliding. This is visible with the ultrasound probe as below (video 3). The presence of a lung point is 100% specific for a pneumothorax and can in fact be used to mark it’s border, if required. This may be of benefit in some scenarios where you wish to manage a pneumothorax conservatively but also monitor it sequentially to assess it’s size.
Video 3: The lung point, pathognomonic of pneumothorax
Regardless of the presence or otherwise of lung sliding, if A lines are seen on one side and B lines on the other, then the diagnosis should be pneumonia (the A/B profile). Again, this makes sense; a unilateral increase in lung water/inflammation indicated by B lines is only likely to be caused by a local process (eg pneumonia).The other diagnosis that can be made at this point is if anterior consolidation is seen (C profile; for an example, see here). In this case, it doesn’t matter whether lung sliding has been present or not: the diagnosis is pneumonia. This is self-evident as infection is the only common pathology to cause the appearance of consolidation anteriorly.
If the lungs are normal up to this point (ie bilateral lung sliding with A lines only), then you move onto the next step. This is to perform a DVT assessment of the lower limbs (find out how to do that here). If a DVT is confirmed then the cause of respiratory failure is pulmonary embolism, and you need not scan any further. Again, this would be the only diagnosis to make sense in the presence of a confirmed DVT; it is conceivable but highly unlikely that the DVT is an incidental finding. It is of course possible to have a pulmonary embolism without a DVT but the observational data found a sensitivity of 81% (ie 4 in 5 PEs will be correctly diagnosed).
The PLAPS point
It is only if the scan is non-diagnostic to this point that you move to scanning the base of the lungs, where in actual fact the majority of pathology will be found. To find this, you move from the lower BLUE point around the chest wall to approximately the posterior axillary line; in practice this is as far posterior as possible in the supine patient so you can see the thoracic/abdominal border (figure 3). This area is postero-lateral on the chest wall and the scan here is looking for a positive or negative Posterior and/or Lateral Alveolar and/or Pleural Syndrome (PLAPS). In other words, the presence of consolidation or pleural effusion at the postero-lateral aspect of the lung.
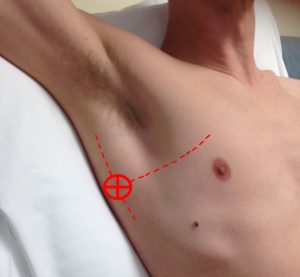
Figure 3: the PLAPS point
A positive scan on either side (visualising consolidation or pleural effusion) would be consistent with pneumonia as the cause of acute respiratory failure, and thus make your diagnosis. No PLAPS would indicate sonographically normal lungs, without evidence for DVT, the only reasonable diagnosis of which would be asthma/COPD exacerbation.
It is worth noting that massive pleural effusion was one of the conditions excluded from this protocol, so if you see a large pleural effusion then you should consider that as a cause of respiratory failure (although, of course, you may not expect that to cause acute respiratory failure requiring ICU admission and therefore not appear within the ‘BLUE protocol cohort of patients).
A simplified version of the BLUE protocol is shown below, suitable for those patients in whom lung sliding is present (the majority).
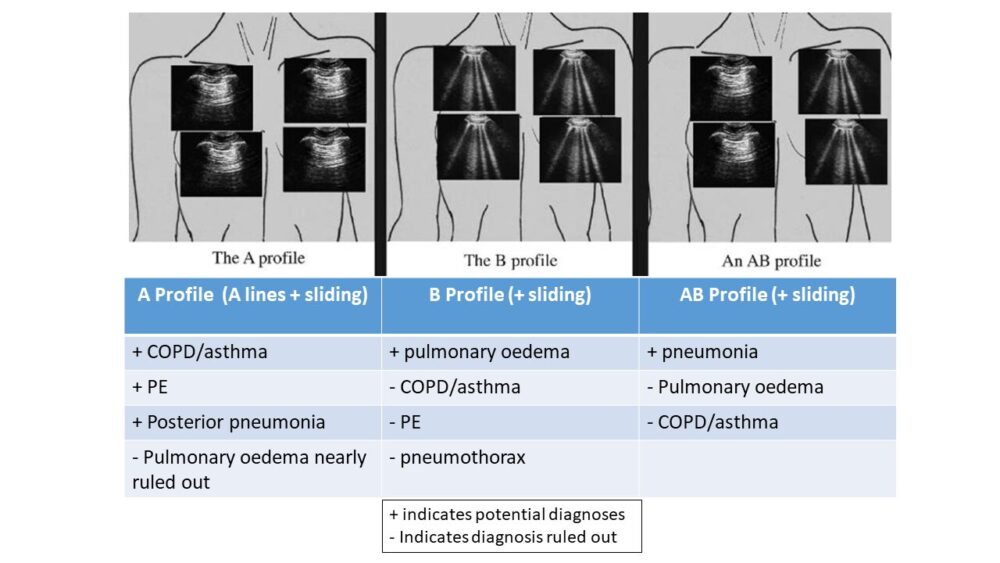
Figure 4: Simplified BLUE protocol
For examples of pathology seen during lung ultrasound, see here.
A copy of the thoracic ultrasound reporting sheet is available here.
Have any questions?
If you have any FAMUS queries not covered by the following pages, please check out or FAQ section. If this still doesn't answer your queries, please contact FAMUS@acutemedicine.org.uk